Captivating Green Tutorial: This look is more for a night out on the town, dinner, or a party. It's a bit too bold to be worn during the day but great for nighttime stuff. It's based primarily on green but has a splash of dark purple so your eyes look smokey as well as bright. I'm a big fan of Almay eyeshadow trios so most of my reviews will feature them. They're cheap ($6-7) dollars and last a long time.
This is what the final product will look like.

This is what you'll need: Almay intense eyeshadow trio in "Bring Out the Green," Almay intense eyecolor eyeliner in "Brown Topaz," eye primer, a small sheet of paper towel, one medium sized eye shadow brush (I bought a random one from a Target brand that cost around $3 each), a smudger brush-not shown in picture (optional, mine is the Kat Von D one), a big eye shadow blender brush; again, from the Kat Von D Eyebrush set (see older posts for review on it).

Step 1: Drip about two or three drops of your eyeprimer on the paper towel and swish your medium sized brush in that area.
Step 2: Using the middle color on the eyeshadow trio (dark green), apply on your eye going a little past the crease. Don't worry if it's messy, you'll clean that up in a second.

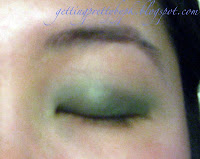
This is what your eyeshadow should look like when your eye is closed.

Step 3: Using your blender brush, sweep back and forth 2-3 times near the crease on each eye. Do NOT sweep over your entire eye, just toward the top where the shadow line is harsh. It's easiest if you hold the brush to where the bristles are vertical and tilt your head back so you can kind of see your eye socket. This should lessen the harsh line of the eyeshadow.

This is what it looks like after step 3, see the difference between this picture and that in step 2? The line is blended better and not abrupt.
Step 4: Using the medium brush, taking the lighter green/teal shade (the top one) and apply to the inner corner of your eye and extend back approximately 1/3 of your eyelid. This will create a brighter eye appearance and highlight your eyes.

Step 5: Taking your blender brush, lightly sweep back and forth where the teal shadow ends and the green shadow shows through. This will make your teal eyeshadow fade into the darker green as opposed to making it seem like two colors side by side and not blended.

Here is what it should look like now.

Step 6: Using the same brush, pat some of the purple (last shade) onto the bristle tips and swipe on the last 2/3 of your crease. Extend the color up slightly past your crease so that when you have your eyes open, the color can be seen a little.

This is what it should look like when your eyes are closed.

Step 7: Taking the brown eyeliner, line your upper lash line by tilting your head back and pulling your eyelid slightly up (you can do this by lifting your eyebrows so that you don't touch your eyelid and mess up the eyeshadows). If you want, you can line the lower lash line too because this brown isn't really dark and won't be overpowering. I usually line my upper lash line and the outer half of my lower lash line. I've found that if you don't line your eyes with some type of eyeliner, your eyes tend to look smaller and the eyeshadows less flattering. However, if you have really long and thick eyelashes that are dark, eyeliner is optional.


Step 8: This step is optional. You can leave your lower eyeliner as is or you can take your smudger brush and lightly sweep back and forth on your lower lash line to make the eyeliner look smokey and less harsh.

Step 9: Finally, apply mascara and you're done! This is what the final picture looks like.


Hope you enjoy the tutorial and have a wonderful weekend!
i love this! it's bright but wearable. I just might have to try this for myself one night soon. great job!
ReplyDelete